なんかアクセスしたタイミングで画面が暗くなって許可を求められたので拒否をした
なんかアクセスしたタイミングで画面が暗くなって許可を求められたので拒否をした
![]()
![]()
![]()
前のエントリでいい感じで書けそうみたいなことを書いたが、例外処理について言及していなかった。
CompletableFuture は Promise 同様エラー処理用にcompleteExceptionally(Throwable ex) というメソッドを持っている。これを呼ぶと後続の exceptionally() にエラー処理が移る (そしてリカバリできる) 。
では普通の、時間のかかり、なおかつ検査例外を出す同期メソッドを CompletableFuture として実行する場合例外はどうすればいいだろうか?
runAsync などの中では CompletableFuture インスタンスは見えないので、catch して明示的に completeExceptionally() することができない。
いくつか方法がありそうだけど、よくわかってない
| package com.company; | |
| import java.util.concurrent.CompletableFuture; | |
| import java.util.function.Consumer; | |
| public class Main { | |
| public static void main(String[] args) { | |
| new Main().doMain(args); | |
| } | |
| private static <T> CompletableFuture<T> async(Consumer<CompletableFuture<T>> function) { | |
| final CompletableFuture<T> future = new CompletableFuture<>(); | |
| function.accept(future); | |
| return future; | |
| } | |
| public void doMain(String[] args) { | |
| final CompletableFuture<Void> future1 = async(f -> { | |
| try { | |
| f.complete("Foobar"); | |
| } catch (Exception e) { | |
| f.completeExceptionally(e); | |
| } | |
| }).thenAccept(x -> { | |
| System.out.println(x); | |
| }); | |
| final CompletableFuture<Void> future2 = async(f -> { | |
| try { | |
| throw new RuntimeException("exception"); | |
| } catch (Exception e) { | |
| f.completeExceptionally(e); | |
| } | |
| }).exceptionally(ex -> { | |
| System.out.println("exception!!"); | |
| return ex; | |
| }).thenAccept(x -> { | |
| System.out.println(x); | |
| }); | |
| CompletableFuture.allOf(future1, future2).thenRun(() -> { | |
| System.out.println("All done"); | |
| }); | |
| } | |
| } |
こういう感じで、JS でいうところの new Promise( (resolve, reject) => {}) に相当するメソッドを作って、明示的に同期コードでの終了時/例外時の処理を行う。
JS の流れだとわかりやすいけど、ラッパメソッドとかいちいち書きたくはないし、せっかくマルチスレッドによって同期的に書ける処理を非同期っぽくなおすのはダサい。
runAsync 内で全例外をキャッチして非検査例外にしてしまう。
この場合投げられた例外は java.util.concurrent.CompletionException (これも非検査例外) にさらにラップされて exceptionally に渡される。
全例外 catch して completeExceptionally するのも実質非検査への変換なのでこれでもよさそう。実質はラッパメソッドでキャッチして completeExceptionally するのと変わりない。
検査例外をうまく生かしつつ処理するというのが難しそう。各ステージで検査例外は全て処理するというのが想定されているのだろうか? とりあえず全部 catch して uncheck にするというのをやっていると、当然検査例外をまともに処理しようという気にはならなくなる。
検索例外を投げるメソッドは、直接メソッド参照のスタイルで runAsync(this::FooBar) 等と渡せない。
![]()
![]()
![]()
(実質的な) 非接続状態のことをハイインピーダンス (Hi-Z) 状態 (Tri-state) と言う。久しぶりに触ると、どうすれば Hi-Z になるんだっけ??となるのでメモしておく
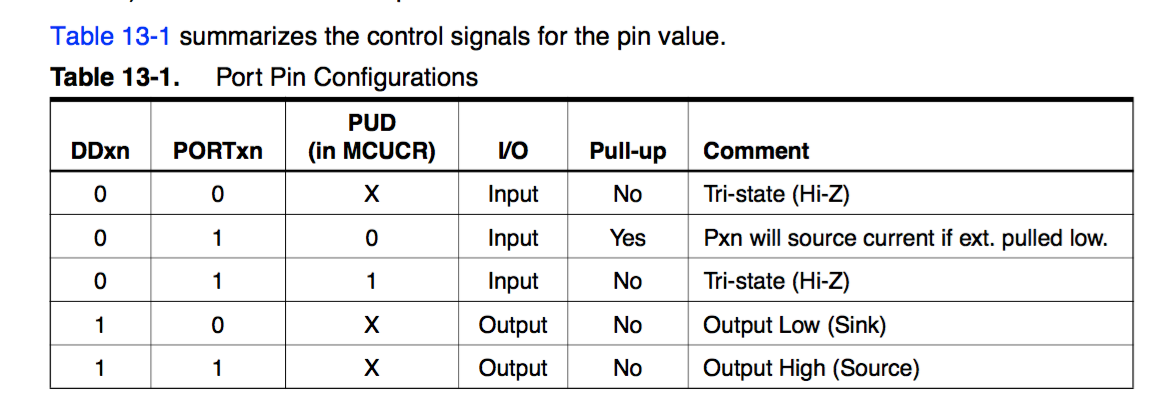
Arduino 風にいうと、
プルアップ有効のケースだと、pinMode が INPUT かつ digitalWrite で LOW したピンはハイインピーダンス
![]()
![]()
![]()
続きをかきました 500 Can't connect to lowreal.net:443 (certificate verify failed)
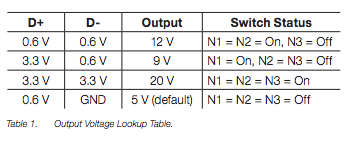
仕様はちょっと前に調べて、先日対応バッテリーがきたので試してみました。
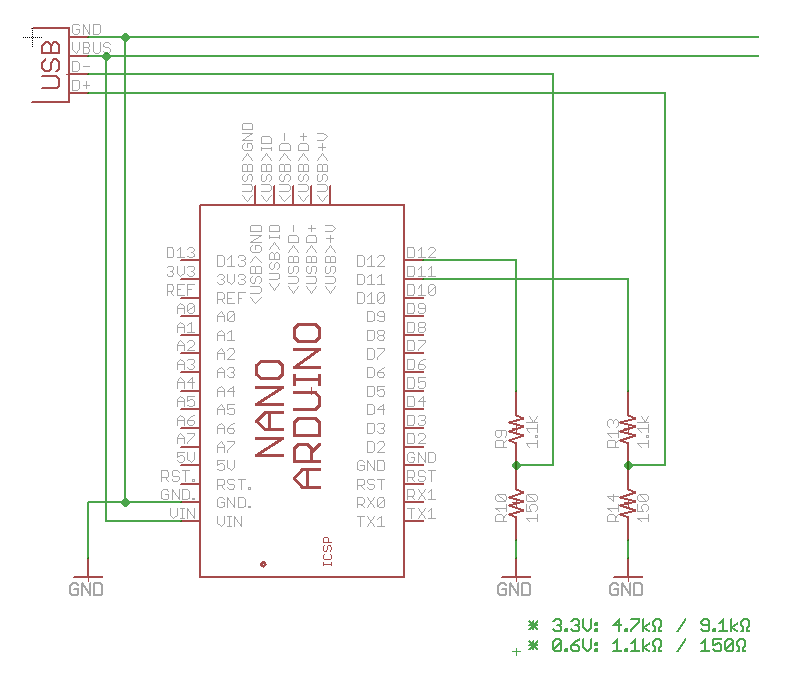
12V を出す場合必要なのは D+ 0.6V / D- 0.6V なので、非常に簡単な構成。
VBUS には QC時に 5V〜12V の電圧がかかる。直接 Arduino の VIN に繋いでいるが、Arduino 側で 5V レギュレータが入っているので問題ない (ref. https://www.arduino.cc/en/uploads/Main/ArduinoNano30Schematic.pdf )。当然 5V ピンに直接繋いではならない (燃える)
#include <Arduino.h>
#include <avr/sleep.h>

const int D_PLUS  = 11;
const int D_MINUS = 12;

/**
 * Arduino nano has 5V regulated power, so required voltages are generated with:
 * 3.3V: 4.7kΩ / 9.1kΩ
 * 0.6V: 1.1kΩ / 150Ω
 *
 */

void setup() {
	// wait until stable connection
	delay(1000);

	// reset line
	pinMode(D_PLUS, OUTPUT);
	pinMode(D_MINUS, OUTPUT);
	digitalWrite(D_PLUS, LOW);
	digitalWrite(D_MINUS, LOW);
	delay(100);

	// D+ and D- to 0.6V for 1.25s
	digitalWrite(D_PLUS, HIGH);
	digitalWrite(D_MINUS, HIGH);
	delay(1500);

	// D- to 0V for 1ms
	digitalWrite(D_MINUS, LOW);
	delay(2);

	// Set voltage
	digitalWrite(D_MINUS, HIGH);

	set_sleep_mode(SLEEP_MODE_PWR_DOWN);
	sleep_mode();
}

void loop() {
} 12V とれたよ〜 (赤が VBUS、黄は D-)
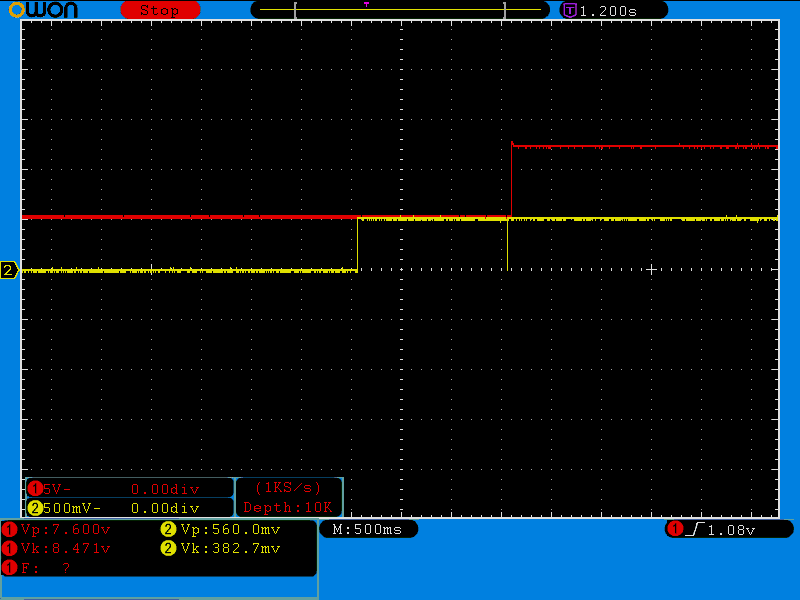
9V に対応する場合 D+ を途中から 0.6V -> 3.3V とする必要があるので、もう少し回路とコードが必要。
![]()
![]()
![]()
(Java です)
例えばクローラみたいなのを書こうと思うと、
みたいなのが大まかにあって、リモートからダウンロードしてくるのは2並列で、ストレージに格納するのも2並列で (ダウンロード先とストア先は別のところなので別々に並列にしたい)、メタデータ更新するのはコリジョンさせたくないから1スレッドで、みたいなことをやりたくなることがある。そういうイメージでいきます。
Java8 から CompletableFuture というのが入って、これが JavaScript の Promise みたいなやつにあたるようだ。名前が長くてウザいが我慢するしかない。
Java には ExecutorService というスレッドプールを管理していい感じに実行してくれる仕組みがあり、Executors.newXXX() というのにいくつか実装がある。
これらを組合せるとマルチスレッドで同期処理を非同期して結果を集めて同期したりみたいなのが強力に書けそう。同期にしたいのか非同期にしたいのかどっちやねん感がでてくる。
いっぱいメソッドがあるが、とりあえず CompletableFuture.runAsync() と thenRunAsync() あたりでなんとかなりそう。
実際こういう感じでできる。
並列で行われる部分は当然スレッドセーフでなければならないが、このコードの場合 metaExecutor はシングルスレッドなので metaExecutor 内では考えることが減る (downloadExecutor/storeExecutor/metaExecutor それぞれは並列で動くけど)
import java.util.Arrays;
import java.util.List;
import java.util.concurrent.CompletableFuture;
import java.util.concurrent.ExecutorService;
import java.util.concurrent.Executors;
import java.util.stream.Collectors;

public class Main {

    public static void main(String[] args) {
        new Main().doMain(args);
    }

    private ExecutorService downloadExecutor;
    private ExecutorService storeExecutor;
    private ExecutorService metaExecutor;

    private void heavyProcess(String name) {
        System.out.println(String.format("%s -- START", name));
        try {
            Thread.currentThread().sleep((long) (Math.random() * 1000));
        } catch (InterruptedException e) {
            e.printStackTrace();
        }
        System.out.println(String.format("%s -- END", name));
    }

    public void doMain(String[] args) {
        downloadExecutor = Executors.newFixedThreadPool(2, r -> new Thread(r, "download"));
        storeExecutor = Executors.newFixedThreadPool(2, r -> new Thread(r, "store"));
        metaExecutor = Executors.newSingleThreadExecutor(r -> new Thread(r, "meta"));

        final List<String> urls = Arrays.asList(
                "http://example.com/1",
                "http://example.com/2",
                "http://example.com/3",
                "http://example.com/4",
                "http://example.com/5",
                "http://example.com/6",
                "http://example.com/7",
                "http://example.com/8",
                "http://example.com/9"
        );


        Thread.currentThread().setName("Main");
        System.out.println(String.format("[%s] START", Thread.currentThread().getName()));

        final List<CompletableFuture<Void>> futures = urls.stream().map(
                url -> CompletableFuture
                        .runAsync(() -> {
                            heavyProcess(String.format("[%s] downloading for %s", Thread.currentThread().getName(), url));
                        }, downloadExecutor)
                        .thenRunAsync(() -> {
                            heavyProcess(String.format("[%s] storing for %s", Thread.currentThread().getName(), url));
                        }, storeExecutor)
                        .thenRunAsync(() -> {
                            System.out.println(String.format("[%s] updating meta for %s", Thread.currentThread().getName(), url));
                        }, metaExecutor)
        ).collect(Collectors.toList());

        CompletableFuture.allOf(futures.toArray(new CompletableFuture[futures.size()])).thenRun(() -> {
            System.out.println(String.format("[%s] FINISH", Thread.currentThread().getName()));
        });

        // .join() しなければ即座にこの関数は終わる.
        System.out.println(String.format("[%s] END OF MAIN", Thread.currentThread().getName()));
    }
}
これとは別に BlockingQueue を使ったり、各タスクが次のタスクを自力で次の Executor に投げるみたいな実装を書いてみたが、CompletableFuture のほうが簡潔に書けた。
こんな感じで動く
[Main] START
[download] downloading for http://example.com/1 -- START
[download] downloading for http://example.com/2 -- START
[Main] END OF MAIN
[download] downloading for http://example.com/2 -- END
[download] downloading for http://example.com/3 -- START
[store] storing for http://example.com/2 -- START
[download] downloading for http://example.com/1 -- END
[download] downloading for http://example.com/4 -- START
[store] storing for http://example.com/1 -- START
[download] downloading for http://example.com/4 -- END
[download] downloading for http://example.com/5 -- START
[download] downloading for http://example.com/3 -- END
[download] downloading for http://example.com/6 -- START
[store] storing for http://example.com/2 -- END
[store] storing for http://example.com/4 -- START
[Main Executor] updating meta for http://example.com/2
[store] storing for http://example.com/1 -- END
[store] storing for http://example.com/3 -- START
[Main Executor] updating meta for http://example.com/1
[store] storing for http://example.com/3 -- END
[Main Executor] updating meta for http://example.com/3
[download] downloading for http://example.com/6 -- END
[download] downloading for http://example.com/7 -- START
[store] storing for http://example.com/6 -- START
[download] downloading for http://example.com/5 -- END
[download] downloading for http://example.com/8 -- START
[store] storing for http://example.com/6 -- END
[store] storing for http://example.com/5 -- START
[Main Executor] updating meta for http://example.com/6
[store] storing for http://example.com/4 -- END
[Main Executor] updating meta for http://example.com/4
[store] storing for http://example.com/5 -- END
[Main Executor] updating meta for http://example.com/5
[download] downloading for http://example.com/8 -- END
[download] downloading for http://example.com/9 -- START
[store] storing for http://example.com/8 -- START
[download] downloading for http://example.com/9 -- END
[store] storing for http://example.com/9 -- START
[download] downloading for http://example.com/7 -- END
[store] storing for http://example.com/8 -- END
[Main Executor] updating meta for http://example.com/8
[store] storing for http://example.com/7 -- START
[store] storing for http://example.com/9 -- END
[Main Executor] updating meta for http://example.com/9
[store] storing for http://example.com/7 -- END
[Main Executor] updating meta for http://example.com/7
[Main Executor] FINISH
知らない機能がいっぱいあるのでもっと簡潔に書ける気がします。
![]()
![]()
![]()
土曜日の午後ぐらいから体調が悪くなった。日曜夜ぐらいから良くなって、朝には解熱した。
普段でも夢見が悪いが、熱がでるとさらにひどい夢を見る。なんとかしてほしい
![]()
![]()
![]()
もはや Promise がスタンダードに入り、モダンな実行環境ではポリフィルすら必要なく使えるケースが増えましたね。
かくいう自分も JSDeferred は使っておらず完全に Promise 依存に切替えております。外部ライブラリ依存なんてないほうがいい!!
機能的にはほぼ変わりがないので機械的に置き換えできますが、Promise は1度だけしか resolve できない点だけ違うので注意が必要。JSDeferred は値を保持しませんが、Promise は resolve した値を保持し、その後の then ではその値が返ってきます。
var resolver;
var promise = new Promise(function (resolve, reject) {
	resolver = resolve;
});

promise.then(function (r) {
	console.log(r); //=> foo
});

resolver('foo');

promise.then(function (r) {
	console.log(r); //=> foo
});

resolver('bar'); // nothing happened (invalid operation)
JSDeferred は遅延された (Deferred) な処理を表現していますが、Promise は未来の値に関する約束を表現している点で違いがでます (Promise は値なので継続(手続)のように扱うことはできない)
JSDeferred() のグローバルな next() を引数なし Promise.resolve() に置き換えます。あとの next() は全部 then() に置き換えます。
next(function () {
    alert(1);
    return next(function () {
        alert(2);
    }).
    next(function () {
        alert(3);
    });
}).
next(function () {
    alert(4);
});
これを
Promise.resolve().then(function () {
    alert(1);
    return Promise.resolve().then(function () {
        alert(2);
    }).
    then(function () {
        alert(3);
    });
}).
then(function () {
    alert(4);
});
こうじゃ
Promise.all(list) を使う
Promise.race(list)
new Promise( (resolve) => {
    setTimeout(resolve, 100);
});
![]()
![]()
![]()
ネットで文章書くときに一番重要なのは、ゴミみたいなことを言ってくる人をできるだけ避けること。
ネットでは常に書き手が最初から不利な状態にある。だから中立よりも負よりに考えて書かなければ、不要な謗りをうける。
読み飛ばしても良いと本人が思った場合その通り読み飛ばす、ないしは読み飛ばさずに内容を理解しようと努めてくれる。なので、そもそもこういう人向けには配慮の必要がない。
読み飛ばすということができず、ただ書いてあること全てを飲みこもうとする。こういう人に対して「ここは読む価値はありませんよ」とか「本題とは直接関係ありませんよ」ということを書く必要がある。そうしないと、こういう人は飲み込めなかった文をそのまま書き手に投げつけてくる。
![]()
![]()
![]()
UIには出ていないがAPI経由だと取得できる。認証なしで誰でもとれる (権限いらない)。
curl https://api.github.com/repos/atom/electron/releases | ruby -rjson -e 'JSON.parse(ARGF.read).each{|release| release["assets"].each{|a| puts "% 10s %s %s" % [release["name"], a["download_count"], a["name"]] } }'
![]()
![]()
![]()
Kazuho's Weblog: H2O version 1.7.0-beta1 released with enhanced mruby scripting, CGI, and much more
H2O version 1.7.0-beta1 からは htpasswd も使える Basic 認証のサポートが入ったので、以下のようなコードは最早必要ありません。
現時点だと h2o に Basic Auth の機能が入ってなさそうなので mruby.handler で雑に書く
        mruby.handler: |
          USER = "tsun", PASS = "dere"
          lambda do |env|
            auth = env['HTTP_AUTHORIZATION']
            if auth
              method, cred = *auth.split(' ')
              if method == "Basic"
                user, pass = cred.unpack("m")[0].split(':')
                if user == USER && pass == PASS
                  return [ 399, {}, [] ]
                end
              end
            end
            [ 401, { 'Content-Type' => 'text/plain', 'WWW-Authenticate' => 'Basic realm="Restricted"' }, [ 'Authorization Required' ] ]
          end
これをかけたいとこに書けば basic auth がかかる。
最初 htpasswd 読むようにしようとしたが mruby に String#crypt はなかったのでやめた。
![]()
![]()
![]()
現行でも採用事例がある USB コネクタでの急速充電の仕様。USB は規格上 5V なので、急速充電のために電力高めようとすると電流が多くなってしまいコネクタやケーブルの発熱を招く (USB のコネクタは定格では 1.5A までしか流せない) 。なので、供給電圧自体を上げて (9V, 12V, 20V) 供給可能電力を増やそうというもの。
USB 公式には USB PD (Power Delivery) があるが、USB PD のためにはまず USB Type-C コネクタの普及が必要だし、ハンドシェイクが割と複雑なので専用のコントローラICが必要。
一方 Quick Charge 2.0 は既存 USB コネクタを流用した規格かつ簡単なプロトコルなので採用しやすい。
既に対応したモバイルバッテリーがあるし、端末側でも対応しているものがちらほらある。(ZenFone 2 も対応している)。割と単純なプロトコルなので Quick Charge とは言わずに対応してる端末もある (権利的なアレかな)
公式の仕様書がみつからない。NDA? よくわからんけど、サポートチップのドキュメントやリファレンスデザインのドキュメントにはある程度詳しいことが書いてある。
D+, D- ラインに対し 0V, 0.6V, 3.3V の3値を使う。
D+ をプルダウンすると直ちにリセットして Quick Charge 2.0 のステートを抜けるようなので、各状態遷移の間は D+ を0Vにしないようにする必要がある。
D+ 0.6V, D- が GND の場合は 5V のなので、初期化 (D- 1ms プルダウン) 直後は必ず 5V になる。
ref.
http://www.gamma.pl/PDF/powerint/chiphy.pdf
http://www.tij.co.jp/jp/lit/ug/tidu917/tidu917.pdf
![]()
![]()
![]()
4年ほど前の引っ越しからずっと固定回線を契約せずモバイル回線+テザリングだけで自宅回線をまかなってきた。
最初は WiMAX 付きのスマフォだったので良かったのだが (RTTは長いが容量制限はない)、LTE になって 7GB 制限ができてかなり不便になった。
キャリアに不満がつのって MVNO にしたらそもそも安定して通信できなくなった。
ググっても評判の良いプロバイダというのは存在しない。マジで存在しない。どこも名目上のスピードは 100Mbps だったり 1Gbps だったりするけどこれは全くアテにならない。だからといって、口コミみたいなのも全くアテにならない (口コミ書く人のリテラシがバラバラすぎるから)
ということで、2年縛りみたいなクソなことをやってないところのうち安いところから試すことにした。
モバイル回線 + 固定回線で 5120円ぐらい。
![]()
![]()
![]()
金曜あたり頭がぼーっとするなぁと思っていたら、土曜日午後あたりから急激に身体もだるくなってひたすら寝ていた。
![]()
![]()
![]()
Electron の MAS ビルドが v0.34.0 から提供されるようになったので、それを使って出してみた。が、v0.34.0 にはまだ private api usage があって reject だった。バグ報告したらすぐ修正されて、v0.34.2 で治った。
https://github.com/cho45/Chemrtron
App Store に出すことができたら github releases のほうにはパッケージをアップロードしないようにしようと思ったけど、今のところあげてある。パッケージ自体は一緒で sandbox 化もされている。
いろいろ思うとことがあって、開発環境をつくって、いつでもパッチ書けるような状態にするインセンティブがどこかで働くとよいな、と思うとパッケージを releases にあげない (できあいのが欲しければ買う) のがいいと思うんだけど、そもそも Chemr 程度ではそのようなインセンティブは働かないだろうという…
税込 (消費税8%) ¥12,744/年もかかります。勉強代だと思って1回払ってみましたが2度と払いたくない。元をとれるならいいけど
![]()
![]()
![]()