mbed USBMIDI で Lightroom 用の MIDI インターフェイスを作る
MIDI デバイスを Lightroom のコントローラとして使えるプラグインとして MIDI2LR というのがある。市販のMIDIコントローラを使ってLightroomの現像パラメータなどを可変できるというもの。
しかし意外と市販のMIDIコントローラでちょうどいいのがないという問題がある。インターフェイス上の制限から、最適なコントローラは単純なロータリーエンコーダとスイッチの組合せで、常にインクリメンタルな値を送るものとなる。
ちょうどいいのがないなら専用品を作れば良いので、まずブレッドボードレベルで実装してみる。
コード
ロータリーエンコーダを処理するコードがあるのでちょっと長く見えるが main は短い。mbed の USBMIDI ライブラリのおかげ。
LPC11U35 で動かすことを前提として、ロータリーエンコーダのA相・B相を、それぞれ P0_11, P0_12 に繋ぐコードになっている。時計周りのときB相が先行するコードなので、逆のロータリーエンコーダの場合は逆にする。(ロータリーエンコーダの位相方向って決まってないっぽい?)
ロータリーエンコーダのチャタリング対策も入れてる。ググってみるとあんまりやってるコードを見ないけど必要ないのかな?
#include "mbed.h"
#include "config.h"
#include "USBMIDI.h"
class QEI {
static const int8_t INVALID = 2;
static uint8_t decode(const uint8_t prev, const uint8_t curr) {
/**
* 4bit decode table
* bit3 bit2 bit1 bit0
* [ prev A ][ prev B ][ curr A ][ curr B]
*
*/
switch ( (prev << 2) | curr) {
case 0b0000: return 0;
case 0b0001: return 1;
case 0b0010: return -1;
case 0b0011: return INVALID;
case 0b0100: return -1;
case 0b0101: return 0;
case 0b0110: return INVALID;
case 0b0111: return 1;
case 0b1000: return 1;
case 0b1001: return INVALID;
case 0b1010: return 0;
case 0b1011: return -1;
case 0b1100: return INVALID;
case 0b1101: return -1;
case 0b1110: return 1;
case 0b1111: return 0;
}
return INVALID;
}
volatile uint8_t prev;
Timeout timeout;
void interruptSample() {
uint8_t ok = sample();
if (!ok) error = 1;
}
void interruptDelay() {
// avoid chattering
timeout.attach(callback(this, &QEI::interruptSample), delay);
}
public:
volatile int position;
volatile uint8_t error;
InterruptIn phaseA;
InterruptIn phaseB;
float delay;
QEI(PinName _a, PinName _b, float _delay = 0.005) :
prev(0),
position(0),
error(0),
phaseA(_a),
phaseB(_b),
delay(_delay)
{
phaseA.mode(PullUp);
phaseB.mode(PullUp);
}
void enableInterrupt() {
phaseA.rise(callback(this, &QEI::interruptDelay));
phaseA.fall(callback(this, &QEI::interruptDelay));
phaseB.rise(callback(this, &QEI::interruptDelay));
phaseB.fall(callback(this, &QEI::interruptDelay));
}
/**
* sample digital input and return ok
*/
uint8_t sample() {
uint8_t curr = phaseA.read() << 1 | phaseB.read();
int8_t incr = decode(prev, curr);
prev = curr;
if (incr == INVALID) {
return 0;
}
position += incr;
return 1;
}
};
void show_message(MIDIMessage msg) {
switch (msg.type()) {
case MIDIMessage::NoteOnType:
printf("NoteOn key:%d, velocity: %d, channel: %d\r\n", msg.key(), msg.velocity(), msg.channel());
break;
case MIDIMessage::NoteOffType:
printf("NoteOff key:%d, velocity: %d, channel: %d\r\n", msg.key(), msg.velocity(), msg.channel());
break;
case MIDIMessage::ControlChangeType:
printf("ControlChange controller: %d, data: %d\r\n", msg.controller(), msg.value());
break;
case MIDIMessage::PitchWheelType:
printf("PitchWheel channel: %d, pitch: %d\r\n", msg.channel(), msg.pitch());
break;
default:
printf("Another message\r\n");
}
}
USBMIDI midi;
QEI encoder1(P0_11, P0_12);
int main() {
printf("init\r\n");
encoder1.enableInterrupt();
midi.attach(show_message);
while (1) {
if (encoder1.position) {
int8_t val = encoder1.position;
printf("send CC 1 %d 0\r\n", val);
midi.write(MIDIMessage::ControlChange(1, val, 0));
encoder1.position = 0;
}
}
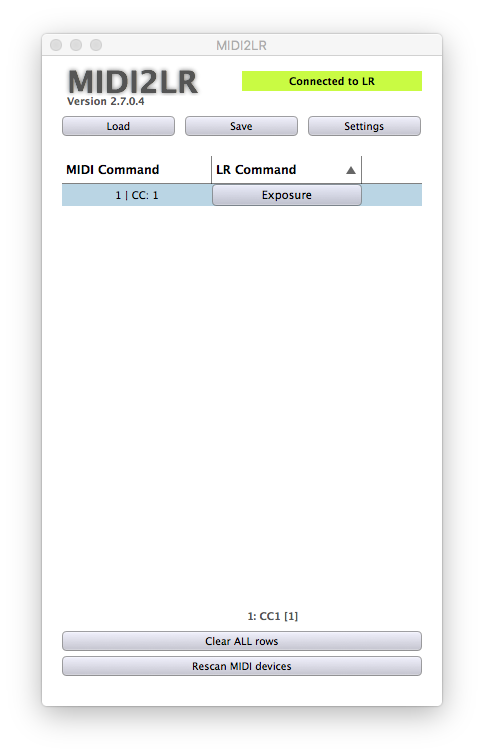
} MIDI2LR の設定
MIDI2LR の設定画面を開いた状態でロータリーエンコーダを動かすと、以下のように表示されるので、ここでは Exposure (露出) に割り当てている。
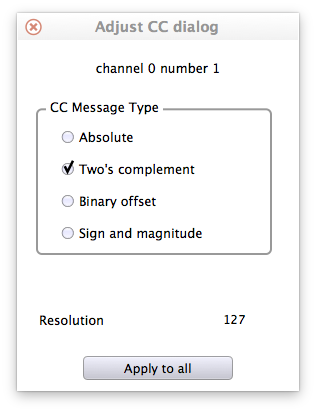
さらにこのボタンの部分を右クリックして、Adject CC dialog を出し、CC Message Type を Two's complement に設定する。
備考
これですんなり動く。ロータリーエンコーダのA相・B相の仕様を確認しないと回転方向が逆になったりするのだけ注意が必要 (ソフトウェア側でなんとでもなるけど)
この調子でエンコーダーを増やしていけば実装上は良いことになる。しかしロータリーエンコーダ1つあたり2ピンのIOを使うので、実際は GPIO 拡張が必要になる気がする。
関連エントリー
- Lightroom 用ハードウェアの自作 mbed USBMIDI で Lightroom 用の MIDI インターフェイスを作る | tech - 氾濫原 の続きで、実際に使えるも...
- OWON SDS7102 のロータリエンコーダの不具合をなおす OWON デジタルオシロスコープSDS7102 超薄型 1Gsサンプリング100MHzFFT機能付カラーポータブルフルセット【国内正規品】 ...
- LM1972 デジタルボリュームを mbed で LM1972 デジタルボリューム | tech - 氾濫原 の続きで、Arduino ではなくmbed環境での実装。 LPC11U35 で試...
- VALETON GP-5 + 自作MIDIデバイスたち VALETON GP-5 というマルチエフェクタを買ってみた。小さいながら凝っていて、アンプシミュレータも内蔵しているのでヘッドフォン直結や...
- MAX7219 8桁 7セグメント LED モジュール / Arduino だいたい300円ぐらいのものです。MAX7219 というLEDドライバを使っていて、SPI で表示を変えられます。(正確には 7219 は ...